Development Env With Virtual Machines
Intro
Hey,
Today I'm going to show you my workflow for setting up virtual machines, called in short VMs, to run my development tools and other Operating Systems in a MacBook Pro M1.
We're going to use Parallels application for macOS - the simple reason is because currently it's the only one that has a runnable application for Apple's new M1 chip, through a preview version they have available.
Both VirtualBox and VMWare are currently unable to run on M1 but if you're not running on M1 you should be able to do pretty much the same with any of these other products, being VirtualBox box open source and free to download and use.
Although this is for macOS I think it can be helpful no matter what OS you run as your desktop. We'll be using Canonical's Desktop Ubuntu, but this guide works just as well with the server distribution.
To lay out what we're going to do:
- Install Parallels
- Install XQuartz
- Download Canonical's Ubuntu Linux distribution
- Setup a VM running ubuntu, prepare it for development usage
- Install git, Erlang, Elixir and Emacs and setup a workflow with emacs running from the VM but using it from our macOS desktop
WHY?
As a freelance developer that right now only has access to a single machine to use as personal and work station I felt uncomfortable running all the tools and libraries required for developing code along with very diverse projects, personal and professional, from my personal computer.
There's some options you can choose from to mitigate this, I'm gonna run you through some and the reasons why I would want or not to use them:
-
You can create different users accounts - the problem is that the tools you need will regularly require complete access to administrator rights and have access to the whole filesystem, at least when installing, updating, managing dependencies, etc. It's also impractical to run an account for each project you want to develop in, so it doesn't really cover the reasons why I'm uncomfortable running it all from the same place as my personal system;
-
Another option is to create different partitions and multiple installs of the OS, this takes care of the shared filesystem, permissions, etc, but is quite a lot of work to keep and, specially, if you want to isolate each and every project it becomes infeasible, plus it requires much more storage;
-
Running Containers, namely Docker - this one takes care of my issues, but it requires me to install docker on my running machine. Docker not being both as tailored to macOS as it is to Linux and the fact that it also only has a preview version available for M1 make it a bit more buggy to work with. It also only runs linux OSes. It has advantages, such as being able to emulate directly certain deployment flows as they're used in production, but it's also much less tailored for running a container as a development machine, things for which VM's are really great at, although in its defence it can, with docker-compose, create groups of several orchestrated containers articulating between them as if in a production situation. Nonetheless their proposition value is more towards containerising deployment artefacts;
-
Running one or more instances on the cloud for developing - this would theoretically work but relies on a good internet connection, adds direct costs for running it, and adds latency that without a very fast connection will make it unbearable to do development work (and many instances are more tailored to running server work loads and lack graphical interfaces and such) and is always at least, but usually much more, complex as running the VMs locally (obviously);
-
VM's running locally, on the other hand, can be created and cloned easily (without needing to package them properly), offer the same production like interface, can run different operating systems and because they can emulate a complete machine without practical restrictions they work great as development "containers". With a running linux VM you can also run docker inside of it just fine and reap the benefits of having docker or using it for your development needs in the platform it was written for.
This is why I opted to go with VM's and after the surprise of finding out that most VM software wasn't ready for M1 found Parallels to work just fine with at least Ubuntu in its Preview version - there are some issues still and I wasn't able to run some of other distributions and OSes, such as FreeBSD, but eventually it will work with time. You can only run arm64-based images in M1 though.
You might ask, why go to such great lengths to do something that the macOS is actually good at? The reason is basically, basic security. Not that an electronic computer can ever be completely safe, and much less one connected to external networks and running arbitrary code, but limiting the attack surface is something I've been interested in for quite a while. It's also a good exercise on how to operate between different machines, something you'll have to do if you deploy running code - ssh'ing into a machine, debugging issues, hardening it, are all things that working in this way can give you experience in and a good way to play around, even test different operating systems.
All of the code you download to run, including example projects, libraries, compilers, things you want to try, are usually granted access, necessarily, to your filesystem and runtime as administrators - this means running a Javascript project using Node and NPM can mean downloading thousands of libraries just to build it and try it out. And the same happens for any other language, really, there's no escaping that (*with our current OSes and hardware architectures). This also means that if you have personal and professional projects running on the same system, there's leakage that can happen and sometimes incompatibilities between versions you need to run, like different versions of the same tools and languages for different projects, or different tools requiring different versions of some shared dependency, etc.
The only way to solve for all these considerations in a manageable way is to have different systems that don't share anything - VM's share resources with the host system, but it's in a virtualised environment that is technically completely contained - and then we can treat them as if they were independent machines.
Doing this reduces the things you have to trust in order to run your projects. From having to trust hundreds of thousands of packages, package managers, libraries, companies, products you can reduce it to much less:
- the Hardware maker (in this case it's the same as the OS maker)
- the Operating System you're using and any required libraries (usually SSH related, and those are in *nix, including macOS, part of the distribution itself)
- The VM software
In this particular guide we'll add one more, the XQuartz application for macOS. Basically we only added two additional things we need to trust in terms of our personal computer point of view, the VM software and XQuartz, everything else would always be there no matter what.
Inside each VM we'll still have the same security issues, but now they'll be confined to each VM which reduces significantly the things you have to worry about but, as I said, it's impossible to secure completely any modern electronic computer, and humanely impossible to vet all the software you execute on any given day, so what this does is just hardening and creating some layers of protection.
The reason why we'll use XQuartz is because I don't want to install my favourite editor on my personal part of the computer. It's Gnu Emacs and totally open source, but it's also a very powerful editor for which I'll be installing packages as well. It has included libraries to edit files in remote hosts seamlessly but since it can compile and run lisp it basically can do anything, hence preferring to run it from inside the VM. We could edit directly on the VM, but the screen resolution when running for instance Ubuntu in Parallels is funky and full-screen mode has some issues (perhaps due to being the preview version) which make it less desirable.
With XQuartz running on our host system we can instead run the editor on the VM itself and stream from it, through SSH, the VM X window displays to our desktop, which has the added benefit of being displayed in a native window on our desktop instead of inside the VM window - sincerely at least with emacs, it feels just like I'm running emacs regularly.
macOS used to ship XQuartz but no longer does, although it's still a community package, so at least there's some more vetting around it, or one would so expect.
Always remember - it's impossible to secure a computer, it might as well be that one takes all the agreed steps in order to do so and still end, due to many other things out of our control (besides not using computers), with a hole that just requires someone to do "knock-knock" to open it wide, nonetheless, we should still do what we can with what we know.
INSTALLATION:
First, we'll need to download Parallels, XQuartz and Ubuntu as we'll need those. Everything else will be installed on the VMs. You probably also need to install macOS Xcode developer tools if you haven't, you can do that from the App Store.
Parallels
Parallels announcement blog post
You'll need to signup to download it, unfortunately, on the other hand the preview is free. You'll need the activation code you're given on the download page when installing.
Canonical Ubuntu Page and find your way into an arm64 image
Or directly ubuntu focal-desktop download page
And pick the focal-desktop-arm64.iso image
Once you have these, install Parallels and XQuartz. It will ask you for permissions, Parallels for camera and microphone (this is so the VM can access them if you so wish) and others, but you can reject them all, including the ones for folders and such, don't worry you can manually select the images you want. For XQuartz it will ask for access to the Systems.Events and you can also reject it (at least I have and it hasn't impacted in any noticeable way running XQuartz).
After you installed those, it's probably better to restart your macOS to make sure XQuartz and everything else is ready to go.
Now let's create the VM image we'll be using,
Open the Parallels Application and from the Top Menu click File -> New
CREATING THE VM
It should open the File Assistant, with some disclaimer text about this particular version for M1.
Click Continue
On the next step it should try to find images available on your system by itself, if you allowed access to the filesystem directories where the downloaded Ubuntu image is, it should show it as an available option, otherwise:
Click Choose Manually Select the focal-desktop-arm64.iso image you downloaded before (you'll need to change the file filter from vhdx to
All files)
It should now show you "Ubuntu Linux" with the Ubuntu logo.
Click Continue
On the next window name the folder where it will be placed and check the option on the bottom
Customise Settings Before Installation
and
Click Create
Because we chose to customise the settings the configuration window should be shown. Here you can customise the VM before creating it. You can configure different details you want but this is what I do:
- Hardware Tab:
- CPU & Memory: 2 Processors (host has 8 M1 high/regular cores) and 2GB ram (host has 8GB total, you can run with less certainly).
- Mouse & Keyboard: Mouse - Don't optimise for Games, Keyboard -> Optimise for games
- Security
- Check the Isolate from Mac option (confirm you want to Isolate it)
- Encrypt with Password (you can encrypt it if you want, this will require the password to turn the VM so don't loose if you're storing important things in the VM)
- You can require password for all other options too in case you want.
The "Encrypt with Password" is relative to the VM image and has nothing to do with what you install inside the VM, what this means is, if you encrypt the VM then if anyone got your VM image they couldn't extract any information from the outside "container" (the VM) and couldn't start it either without the password (of course, this should be read, it would make it much more difficult to extract information and not a fact).
Click Continue
It will ask you for access to the camera and microphone again, these are so that the VM can have access to them. This is needed in case for instance you want to do video calls from programs running inside the VM, since I don't I do not provide access to them.
You should now see a BIOS boot menu. Use your arrows keys to choose "Install Ubuntu". You should see a terminal outputting information while doing checks and you should end up in a Ubuntu Install Wizard.
Choose Your Language > Continue Choose Keyboard Layout > Continue Choose the Type of Installation, Minimal Installation; Download updates while Installing Ubuntu > Continue Erase Disk and Install Ubuntu > Install Now
Continue on the confirmation prompt
Wait while it prepares the install.
Pick your Timezone > Continue
Enter the details;
- Name -> test-work
- Computers Name -> test-work
- Username -> test-work
I would suggest using the same computer's name as the username in this particular case, and take note of the password you chose as we'll need it; keep the Require my password to login option checked and
Continue
Wait until it finishes installing. Once it does click the Restart Now button.
If the terminal is stuck on a CD-Rom error, just press "Return" (Enter), wait until it loads the Ubuntu Login screen. Click on the account we created, test-work, and input your password, click Login.
On first login you should be prompted with a Wizard, go "Skip", "Skip", "Don't share data with Canonical", "Skip", "Done".
You might have some prompt to install updates. Usually you can ignore those unless you have some apps installed because the security ones are by default automatically downloaded and installed (although you can also disable them from the settings).
And this is it, we have a basic Ubuntu Linux image running. We can now use it in whatever way we see fit, in our case we want to use it for development so we'll need to do some more things. The overall idea is that we'll have a base almost ready VM ready to be cloned whenever we need a new one for a project or we want to try something.
The first thing we'll want to do is install the SSH server client, at least on Ubuntu Desktop version only the SSH client application is available by default. If you opted for the server distribution you don't need this step. For all commands on terminals they'll be described in blocks
COMMAND
INSTALLING THE SSH SERVER
To install the SSH server in order to have an SSH accessible machine, open a terminal inside the Ubuntu VM and execute:
sudo apt install ssh
It will ask you for the sudo password (should be the same as of the account you created) and then prompt if you want to install, answer Y
Once it's finished installing we need to enable the SSH-server so it can listen for connections.
sudo systemctl enable –now ssh
sudo systemctl status ssh
The last command should show you the status of the service as running (you might need to hit the key q to exit the view)
Now by default we should be able to SSH (securely connect) into this machine from a terminal in our host (the macOS desktop environment from where we are running the virtual machine).
Parallels (and most VM software) will usually have an easy default for sharing the network connection of the host with the VMs started in it and usually take care of designing which ips the machines run and so. To connect to the VM, since it's operating as if it was a remote system, we need its IP. With the Parallels VM window focused, from the menu we can click
Devices > Network > IP addressand click on the ip number shown (it should copy it automatically), otherwise note it down.
Now let's try to connect by opening a terminal in the macOS environment and executing:
ssh test-work@10.211.55.9
(Where the number after @ should be the IP you previously copied, and in case you used a different account name when setting things up test-work should instead be that)
This should display a warning telling you the authenticity of the host couldn't be asserted and asking if you want to proceed, in this case we do, so we type
yes
And hit return. It should now ask us for the password and you should input the password you chose when setting things up and hit return. You should now see a banner info displayed in the terminal and you should be in a terminal prompt inside the VM itself, so if you execute:
ls
You should see the contents of your Ubuntu user folder being displayed. Ok, so we were able to connect to our VM, this would be the same if we were launching a cloud instance for instance, the procedure would be very similar with perhaps the exception if you do it with certain services like AWS, when launching your instance you'll have to add an authorisation key to it which will be included automatically in the instance and required for SSH'ing into it, instead of using a password login as we did here. And that's the next step we'll take, ensuring that our VM only accepts SSH connections using a cryptographic key, in the case of ssh called an authentication key.
To continue, lets exit our SSH shell, by typing on it:
exit
We should see some output telling we were logged out and the connection closed and we should see that our terminal prompt is now that of the macOS account.
For generating authentication keys *nix systems (and also Windows as of now) we'll use an application called ssh-keygen that is part of OpenSSL. You can read the manuals for the ssh-keygen by typing on the terminal if you want to understand better what it does and how to use it (cryptographic keys, their generation and usage, are a very deep rabbit hole, so if you want to check it out and understand you'll probably need to pack some carrots and go bunny hopping around different parts in order to understand the whole thing, this is just the nice rabbit door).
man ssh-keygen
(And hitting q to exit)
I myself have no deep understanding of its internals and a superficial understanding of how it works in conceptual terms (mentioning it just so you don't misunderstand the following steps as being enough for a secure instance), but it's the "public" agreed way of securing at the very minimum a communication channel between two computers.
To generate the proper key we'll run the following command:
ssh-keygen -t rsa -b 4096 -f ~/.ssh/test-work
This means, generate an authentication key, of the type RSA (-t rsa), with a key size of 4096 bits (-b 4096), and store it in the file test-work in the directory ~/.ssh . This will be the private key, the public key will be automatically generated as well and have the same name with .pub appended. This key that is generated is what we use to authenticate a client (that has the authentication key, meaning the private key) into a server/host that has a list of public keys they accept/authorized to access. You'll be asked for a passphrase.
A passphrase is a like a password that you need to input whenever you try to use the key. If they key is going to be used in automated flows then you should not set one for obvious reasons. If you're going to use it manually then it depends, it's more secure to use one but it forces you to always input it or encrypt and decrypt the key on a session basis. If you use it and loose/forget your key then basically you're locked out of using that key (sometimes that means locked out of accessing a remote instance completely). In this case we'll choose to input a passphrase but this really depends on the threat model, intended usage and access to your computer/filesystem concerns.
So type a passphrase, take note of it, and confirm. You should end up with a small ascii art output in the terminal and if you visit your home folder ~/.ssh you should see two files there, one test-work and another test-work.pub.
Now, if we didn't set the VM to be isolated from the Mac Parallels would allow us to copy items between our host environment (the macOS) and the Ubuntu Environment (the VM), which is ok locally, but then this no longer mimics what happens when we need to access a remote host, since there we can't simply "drop" a file from our desktop into our remote host.
The SSH suite also has a command that handles copying and adding a key to a remote computer.
If we were doing it manually, we would need to transfer the public key to the host (using something as scp or rsync that use SSH underneath as well), create an .ssh folder in the users home folder (because the Desktop Version of ubuntu doesn't create one automatically) and then place the key in a file specially named authorized_keys. If we already had an authorized_keys file then we would need to append it to that file instead as to not overwrite previously added keys.
Instead we can use the application ssh-copy-id that handles creating any missing directory, creating the authorized_keys file or appending to it, while setting the correct permissions for both folder and files.
Using that application we can do (remember test-work before @ is the username you chose and the IP is the one you can get from the VM Devices->Network menu):
ssh-copy-id -i ~/.ssh/test-work test-work@10.211.55.9
(-i means identity file, in this case when we created the file we said we wanted to store it under the test-work file if you chose a different filename then replace accordingly)
We should be asked for the password just as when we connected with SSH. Underneath ssh-copy-id uses ssh to connect.
You should see some output from the command including how to test if it worked.
To test we can do:
ssh -i ~/.ssh/test-work test-work@10.211.55.9
It should prompt us to for the passphrase we used when creating the key, if we input that we should be then logged into a shell running on the remote host. This appears to be the same as when we connected the first time, the difference is that we used our authentication key to prove our identity. We were required a passphrase similarly to how we were asked for the users password, but those need not be the same and we could have omitted the passphrase when creating the key, in which case we wouldn't be asked for it and connect automatically - in this case of running a vm locally it would probably even be a better option (or adding it to the ssh agent with ssh-add)
Now we have access to the machine, we should also configure the parameters of this access. There's other flags you can use when generating an authentication key which will embed information on the key itself, of what it can do, for instance, you could make a key that the only thing it does after being authorised into a remote system is executing a specific command but you can also specify this kind of things with a special configuration file that is used by the SSH server, to implement global ssh rules.
The file that holds this configuration is usually found in /etc/ssh/sshd_config (don't confuse this folder with the users .ssh folder in their home directory, where the public key was stored). We'll use the basic terminal like editor nano that ships with Linux (and others *nix systems). We have to prefix our command with sudo because we require root privileges to edit this file.
sudo nano /etc/ssh/sshd_config
Lines starting with # are comments. Reading the comments you can see that those lines are all the defaults, and that to override a default you can uncomment the line and change the value. They're defined as sets of key values separated by a space.
The ones we're interested right now are:
PermitRootLogin , we want to forbid login with passwords, the default should be correct, but let's make it uncommented to be sure, it should read
PermitRootLogin prohibit-password
You can see on the sshd_config link other values, this is for FreeBSD and not linux, so the defaults might be different but the options they take are the same and as such works as a reference, and usually FreeBSD goes to great lengths to provide very readable and more complete (as in with examples) man pages than linux by my experience: FreeBSD sshd_config man
Set the following lines/uncomment as well:
PubkeyAuthentication yes
AuthorizedKeysFile .ssh/authorized_keys
PasswordAuthentication no
UsePAM yes
X11Forwarding yes
PrintMotd no
Then hit:
Ctrl+s (to save)
Ctrl+x (to exit)
There's plenty more options that you can customise and usually you should if it's a server with more than one single user.
For instance forcing a certain user to instead of getting a shell when logging in executing a specific command (so they would only be able to do that), allowing only certain users, disabling or enabling SSH tunnelling if you will need that, changing the default SSH port and many more. Reading the docs would be the best if you want to know more about the options. We kept X11Forwarding as Yes because we'll use it to get graphical output from our VM back into XQuartz running on our server after we prepare a few more things.
Still on the terminal from our VM we should do:
sudo systemctl restart ssh
This is so that the ssh server reloads our changes in configuration. If we now exit
exit
And try to connect plainly without a key
ssh test-work@10.211.55.9
We should be immediately rejected and not able to connect by using our password.
And if we do:
ssh -i ~/.ssh/test-work test-work@10.211.55.9
We should be asked for the passphrase as before and logged into as usual.
If that works we know that our sshd_config is actually in effect, you can only log into the machine if you possess the authorisation key we created previously and no password logins are accepted.
Now let's install some tools in our VM for our work.
Notice that we're installing nodejs, postgresql, inotify-tools and npm. These are all related with development and in this example to simplify we'll install all of them in the same VM, but we could be interested in having a base VM just with curl, git, build-essential, libssl-dev, automate, autoconf and libncurses5-dev to use as the base for any other VMs. So if we were doing that, we would install only the limited set we wanted as base, we would exit the vm shell, shut it down and then from the Parallels Desktop window clone it.
Whenever we would need a new one we would clone from that original one and so on, and then do the remaining installations (node, sql, etc) on the cloned VMs according to our needs (perhaps we want to run a nodejs front-end detached from our Phoenix app, and so would make sense to have a VM just for that, or we would like to have a single VM to hold postgresql and run our databases for all our projects from the same VM, and we would do that).
A last note before proceeding, these steps we're going to do now manually are usually at the very least a bash script that you copy to the VM and run, even the previous actions we took would probably be done in a more automated way, usually that means some provisioning software is used such as Ansible, Chef or others, that create files, copy files, change configurations etc. The benefit of having that as code is that it's easy to change and tweak and easy to apply without forgetting some details, they're essentially recipes that you run. You would still probably after the fact clone the provisioned VMs, or create images with that provisioned baseline for re-use, but that's independent of using more robust solutions to putting a given instance in our desired final state.
So lets run:
sudo apt update
sudo apt install curl git build-essential libssl-dev automake autoconf libncurses5-dev nodejs postgresql-12 inotify-tools npm
You'll have to say Y to the prompt. Most of the packages are so we can then go on to build Erlang and Elixir. Now we'll enable the postgresql server through systemd, so that it starts automatically when the VM boots up.
sudo systemctl enable postgresql
Now we'll git clone asdf which is a version manager, that allows you to run different versions of libraries/software, in this case we'll use it for installing Erlang and Elixir. asdf documentation (follow the instructions there, as the last version might be different)
the instructions to replace if they're different
git clone https://github.com/asdf-vm/asdf.git ~/.asdf –branch v0.8.0
echo -e ". $HOME/.asdf/asdf.sh\n. $HOME/.asdf/completions/asdf.bash" » ~/.bashrc
exec bash
asdf plugin add erlang
asdf plugin add elixir
asdf install erlang latest
With the output of the last command use it to substitute the version in the next one, or if you want a predefined one, use that instead of the latest in the previous and the next commands
asdf global erlang
version
asdf install elixir latest
The same here
asdf global elixir
version
You'll have to do some confirmations while installing some of these.
Once we have these installed we are almost ready to rock we just need the finishing touch, an editor. The reason I'll be using emacs is because that's basically what I use and it has some capabilities that make it easier to use in this kind of workflow, like the ability to run shell(s) from it itself, but anything can work with the difference that with others you might not be able to start shells.
For instance, if you want to start and have a server running in the background, it may require you to start a terminal in the vm itself, or setup a way of running it while not blocking the ssh shell in order to run also your editor. Emacs gets me past those issues easily so I can just start up the VM in Parallels and don't need to even log into it there.
If you have never used it and decide to give it a try, remember to follow the entirety of the included tutorial and stick to it a few days and force yourself to learn how to do everything with keyboard, moving up and down text buffers, paragraphs, beginning/end of words, lines, etc, executing commands, splitting screens, navigating, doing (r)grep searches, installing some specific packages for some life improvements tidbits, etc.
I also keep a repository with my emacs config and some libraries (which are just some Elisp files bundled up) that you can check out at: emacs-sauce github
To install emacs there's now other options, such as snap in ubuntu, but apt is just fine and never borked one installation:
sudo apt install emacs
We should make sure to create or update, our global git ignore config. For our use case this is particular to emacs, since emacs creates a range of temporary files to allow backup in case of errors while editing, buffer recovery, etc, that we don't want to be committed when we commit changes to git repositories on our development machine. We could add them into each project but it's simpler to have a global one so if your OS or editor creates files that you don't want to end up in source control, add them here. To check if we have already a file for this we do:
git config –get core.excludesfile
If this outputs a path, that will be the path to an existing ignore file and we would use that on the following command as the destination to echo, otherwise we know we can just create a file in our users home directory to hold those global exclusions
echo -e "~\n##\n.#*" » ~/.gitignore_global
You can check the contents of the file afterwards with nano ~/.gitignore_global, but it will be:
~
##
.#
Which means respectively, ignore any files whose name ends with ~, starting and ending with #, or starting with .#
Now lets set git to use this as the global exclusion base, with:
git config –global core.excludesFile '~/.gitignore_global'
We should also config the basic info for git, your email and name to use:
git config –global user.email "your@email.com"
git config –global user.name "the name you"
Now I'll just clone my emacs config to have it enabled when I start next time,
git clone https://github.com/mnussbaumer/emacs-sauce.git ~/.emacs.d
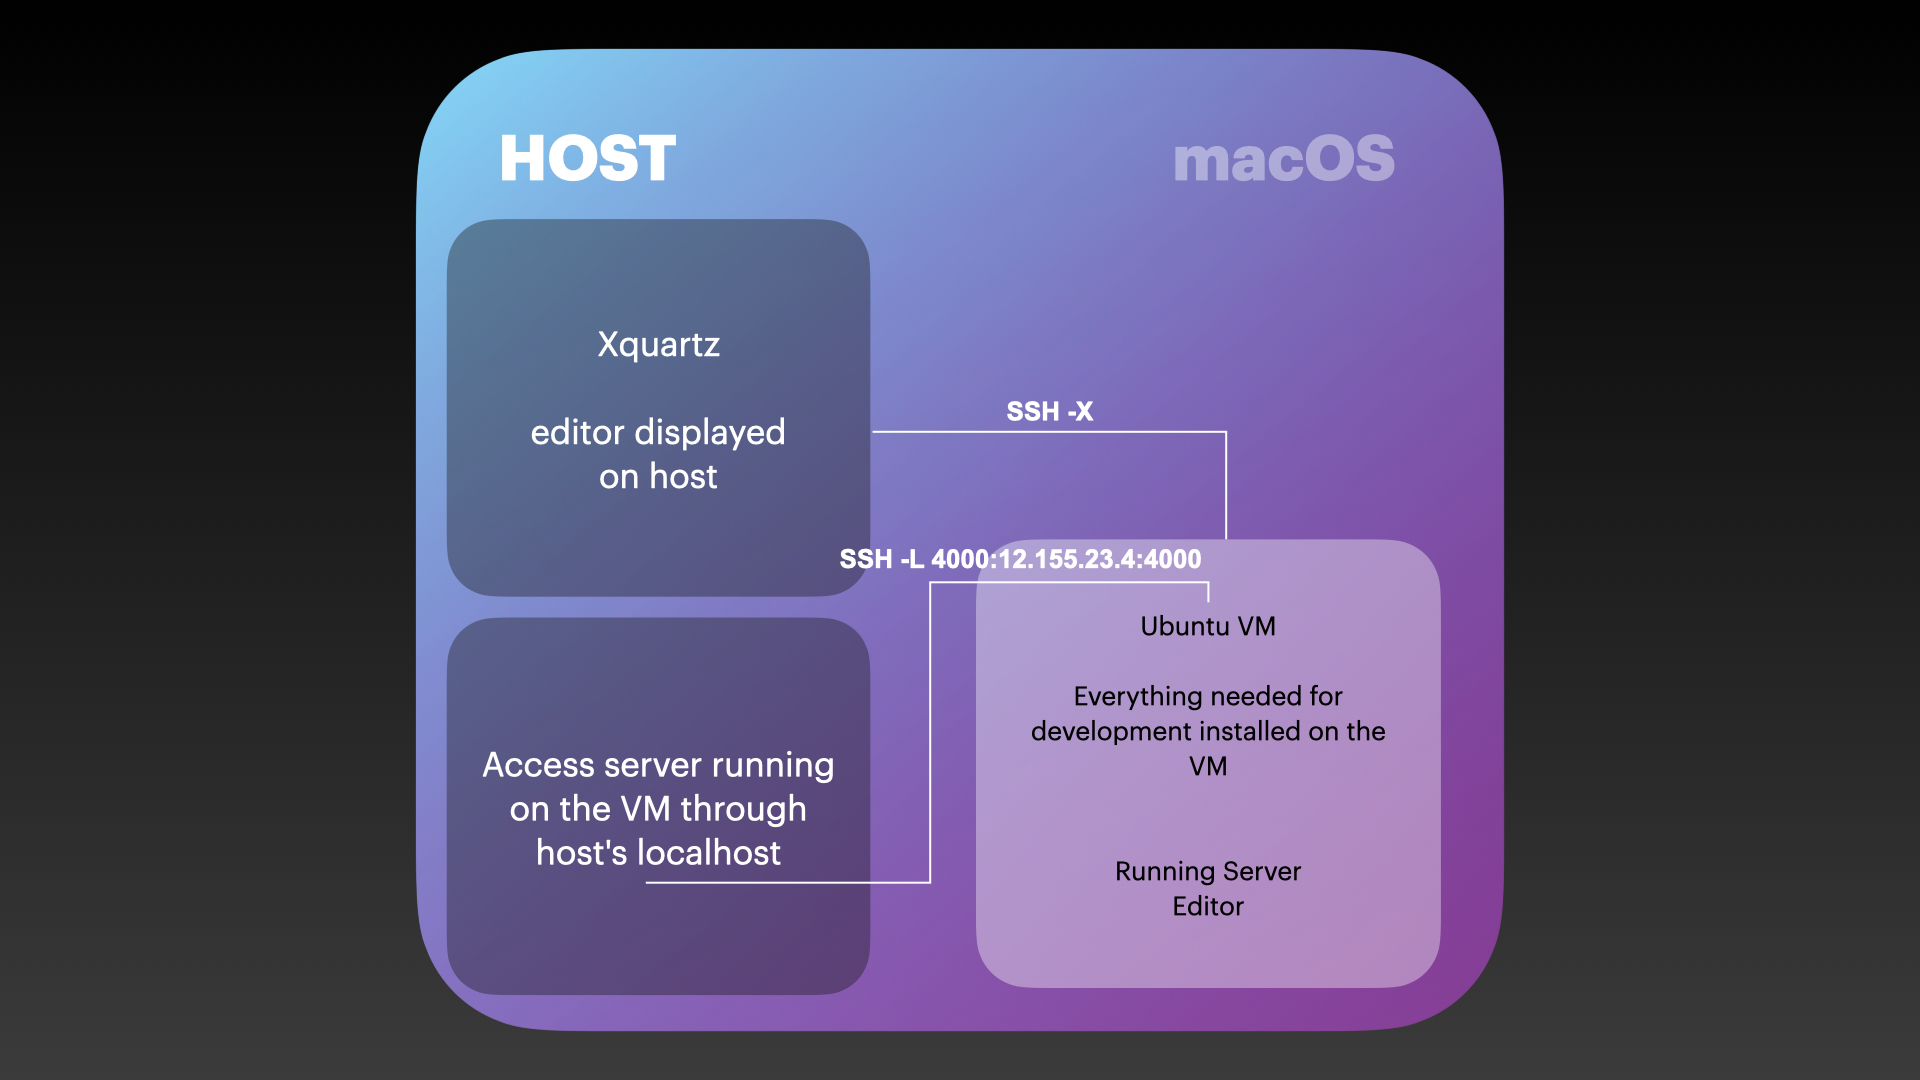
If all went well, then we reboot the instance to make sure that after a restart nothing went wrong and ssh again into it, this time specifying the flag -X which tells the ssh client to request forwarding of the output of any X program started from its session.
This is why we made sure our sshd_config on the remote allowed for X11forwarding and why we installed Xquartz. Xquartz sets up itself, the window management and client side requirements for the X forwarding protocol, plus the basis for the authorisation used by the X application and also to be started automatically whenever a request from a X application comes through.
What happens is that in the session that is started on the remote X11 forwarding is requested, the DISPLAY environment variable is set to a "virtual" device and then the X application will, instead of sending its "commands" to the "display" on the remote, send them to this virtual device, that in turn, relays them through the SSH tunnel to the client (host) that required forwarding. Once it arrives on our end of the pipe Xquartz will be acting as the display device, that executes those commands (usually meaning managing windows and drawing on them and relaying to the remote interactions that happen inside them).
So to reboot we do from the remote shell:
sudo reboot
And then:
ssh -X -i ~/.ssh/test-work test-work@10.211.55.9
Now we should be able to start emacs from the shell and have it open up in our host:
emacs
And there it is.
Now I would launch the server for an application from a shell inside emacs, but this might not be possible if you're using another editor.
In those cases, prior to starting your editor you could start the server endpoint of your app in the background and then emacs. Or if you want to have the endpoint accessible as localhost on your macos desktop, we can create a ssh tunnel that opens a port on our host environment connected to the localhost inside the VM. This makes it the same as running locally outside the vm. Another option is to visit the website through the VM ip address, we'll check out how to do both but first lets create a fresh phoenix project to show it off.
Make sure you're on the vm shell, create a directory where we'll store our projects:
mkdir ~/code
This code directory will live on our home directory, now let's move into it:
cd ~/code
And lets start by installing hex which is the dependency manager for elixir:
mix local.hex
Now let's install the phoenix project generator
mix archive.install hex phx_new 1.5.8
Because we already installed nodejs, npm, postgresql and inotify-tools (since we're in linux to enable automatic reloading of pages when developing in phoenix) we are set regarding this, otherwise we would need to install those, depending on what we wanted (if we didn't use a database we might not need postgresql, if we didn't want to use any JS processing or scss processing, we might not install nodejs and npm and then create projects without webpack).
You might find all that in phoenix's documentation
Now let's create a phoenix project:
mix phx.new hello
We should be asked if we want to install dependencies, let's say Y
Now we need to create our database to use with Ecto. Postgresql installed with apt usually doesn't set a password for the default postgres user, so we should add a password to it:
sudo -u postgres psql
We should be inside a psql shell, where we can run:
ALTER USER postgres PASSWORD postgres;
And then
\q
To quit the shell. Now that we have our default password, and we have postgresql actually running, because we turned it on after installing it, we can now start our Phoenix Endpoint:
cd hello
iex -S mix phx.server
You should see the following printed on your terminal
[info] Running HelloWeb.Endpoint with cowboy 2.5.0 at http://localhost:4000
Webpack is watching the files…
We use iex -S before the name of the mix task in order to open an interactive shell as well, if we did mix phx.server alone we would have the endpoint started but not shell. The iex shell is a repl (read-eval-print-loop) and allows us to run elixir code, and when coupled with an elixir app like this, allows us to do that in the context of the app code (meaning the app code and dependencies are loaded as part of the shell as well)
Now if on our host desktop, we open our browser and visit the IP address of our VM on the port 4000, we should see the Phoenix Start Page. In this case it's http://10.211.55.9:4000 but change the ip address to whatever your VM had.
To exit the shell and kill the endpoint we can hit Ctrl+C twice.
Setting UP tunnels and VM address from inside
So we can already visit our server running from the inside of the VM, but if you notice we have to use the ip address to reach it. That's because the VM is registered on our local network but the localhost on our host points to its own loopback interface.
Having localhost while developing makes it easier for many things, specially if then you're also running another server (say a JS front-end or client app) that communicates with your backend server, since otherwise you'll need to deal with CORS, assets URLs and such that make it more complex. Those things are important to understand too because in production usually you'll have to solve them but they can be an unneeded burden when developing.
The easiest way to solve this is by using a SSH tunnel. Let's open another terminal window/tab on hour host environment and from there do:
ssh -L -i ~/.ssh/test-work 4000:10.211.55.9:4000 test-work@10.211.55.9
What this does, by specifying the -L is opening a connection through SSH to our target VM (test-work@10.211.55.9, change to match your own), and in the process opening port 4000 locally (on our host) and "binding" it to the port 4000 on the remote (10.211.55.9), the local_port:IP.ADD.OF.REMOTE:remote_port in the command we ran is what specifies that.
Now if we go back to our browser in our host, and instead visit http://localhost:4000 we should be greeted with the same page as we were when visiting directly the IP address.
The last thing is in case you want to actually use the IP address of the VM in your code, because it requires an IP address to serve correctly assets, or you have a more complex setup, or you're testing something as close to its production env as possible, we can use a small function in order to have our shells inherit a variable that then can be used in any sub-shell or program running from them.
echo -e "function get_VM_ip() {\n ip -4 a show dev eth0 | grep -Po "(?<=inet\s).*(?=/\d{1,2}\sbrd)"\n} » ~/.shared_bash
This is basically a bash function that greps the network device usually used and checks for the correct entry with a regex expression and captures what is our allocated IP address in the network.
By itself it doesn't do anything, so we need to make it automatically be exported from our .bashrc file:
echo -e "\n. $HOME/.shared_bash\nexport LOCAL_VM_IP=$(get_VM_ip())" » ~/.bashrc
And reload our shell
exec bash
And if we do now:
echo $LOCAL_VM_IP
We should see the VM IP address. Which means that now whenever a program run from our users bash shell (the default when we connect through SSH for this user) that the shell and any program started from it have access to it as an environment variable, so we can use it, for instance, in our app configuration or runtime code.
And that's it. Hope you found it useful.